Monday, December 1, 2008

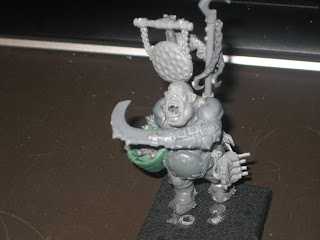
Chaos Ogres 2

Update on my chaos ogre conversions. You'll have to bear with me, as I'm not terribly good at the whole photography thing. First, the chaos ogre with great weapon.


Chaos Warrior Chaos Ogre.


And a quick ogre butcher conversion I'm attempting, mostly just bitz swapping and a little green stuff for the cauldron.


Monday, November 17, 2008

Chaos Ogres

So, after a short side track of creating some buildings for an upcoming Mordheim campaign, I've once again been bitten by the Chaos bug. My latest poject has been a unit of Chaos Ogre Beserkers, Marked by Khorne. These have probably been my most ambitious conversion/green stuff project to date. Many are still in process, but the warrior is essentially complete.


x

Wednesday, October 29, 2008

Mordheim Terrain - Entry 1

So, its been quite a while since i updated this blog. In the next few months I will be kicking off a Mordheim campaign, and that got me motivated to do some serious terrain building. While I didn't successfully pull off any "in-process" shots to show how it was done, I've got the following images to detail my effort thus far. For scale, all these buildings but the dockyards are on 12x12in sheets of MDF.

The first is a stonemason's house. Just a basic house with a few docorative bits. Includes a second floor deck and destroyed walls for placing/hiding models.


The second is the most complete of the buildings, one I've come to call "Bill the butcher's". Complete with stable area for animals, butcher's block in the front yard, and hanging dead cow (thanks GW giant kit).


The next up is the 50% complete first-half of the mordheim dockyards. I see it eventually spanning 2 1x2ft seconds so it could form an entire board edge. The basic structure is done, but needs "mordheimizing" as I call it, adding broken beams, beams and creates floating in the water, and lots of crates along the docks. I haven't decided yet whether one of the dock sections will actually have a ship at it to provide even more high places and cover.


Fourth is the old-mill. The basic structure is completed. It still needs a roof. Also, as its a solid structure, I'm planning to add stairs/platforms/walkways around the outside of it to provide places for models to go, as well as some fallen/pilled logs on the base.


Next is the Dwarf Forge, about 60% complete. The walls still need to be constructed, the chimney finished, and something constructed in the fenced in area. I'm seeing myself using some bitz from the dwarf anvil of doom set.


Last but not least is the clocktower. Its not your eyes, the structure is leaning somewhat, and in true GW/Empire fashing is held up with supports and chains. This has completed rickety ramps and platforms around it for models to climb/snipe from. Not sure what else to decorate around the base. A detail to notice are the clock hands are two-feiry comets, forming a twin-tailed comet during most times of the day.


That is all for now. Updates coming when new things are completed. Most of the future new buildings will be town squares and ruined standard buildings.

Tuesday, March 25, 2008

'Arvard Ardboyz Logo

When putting together name placards for the new 'Ardboyz display case I came to the realization that the club didn't have a true "logo". I was sitting, relaxing after a long Monday following a long weekend, and had a moment of inspiration while looking through one of the recent White Dwarf Magazines at the Gazkull miniature. I picked up a pencil and starting sketching, the the image below was the result.


Saturday, March 15, 2008

Battle Fleet Gothic Terrain

The following are a few pieces of cellestial terrain for use in Battle Fleet Gothic, a spaceship combat game set in the Warhammer 40k universe. They were done as preliminary proof-of-concept pieces prior to a BFG terrain project event being held in a few weeks.


The first is a planet. It was created from a foam ball I bought in a crafts store, with a piece of wire coat hanger punched through it to act as a support. The ball was painted with watered down wood glue prior to spraw painting to prevent the spray paint from melting the foam. Once the basecoat was painted on and dry, I simply drybrushed bands of color around the circumferance of the sphere at varying heights to create a swirling gas-giant effect.


The other three pieces are gas clouds. They are made from MDF/hardboard cut into irregular shapes. Their edges were smoothed with a hand sander, and then they were spray painted black. The gas cloud effect was created simply by dry brushing a dark color onto the board (purple and blue in this case). Then, additional drybrushes were performed with lighter shades of the base color, moving closer and closer to the center of the cloud. I used a streciling brush, as the large flat end of the brush allowed for a good combination of drybrushing and stipling. After the cloud was completed stars of varying size were painted on using white paint and a fine brush.


Tuesday, January 22, 2008

Working with Plasticard

Just a quick update this evening. It was a long day at work. Alot of people are huge fans of the Forgeworld vehicle doors, themed to particular 40k Space Marine armies. While extremely detailed and fantastic looking on the tabletop, they tend to hit the wallet rather hard. 

For those who wish to save some money for anniversaries/christmas/retirement/gas to get to work, here's a low-cost alternative. As I've mentioned in other threads, plasticard, or sheet styrene, is an extremely flexible modeling tool. It can be used to create many basic shapes relatively easily, giving a more 3-dimensional look rather than simple paint-on designs. 
The following steps make it relatively simple

1) trace the outline of the door you wish to decorate onto some white paper (graph paper also works well for symmetrical designs)
2) draw the design on the paper, staying within the traced outline of the door
3) using the side of your pencil, rub graphite onto the back side of the paper behind the design
4) tape the sheet of paper onto a sheet of plasticard
5) trace over the design with a pencil, pressing down hard. This should transfer the design to the sheet of plasticard underneath.
6) remove the sheet of paper, and cut out the design with a sharp exacto knife. 
7) glue the cut-out design to the vehicle door, and prime and paint as normal.

Take it slow on any curves in the design, as plasticard tends to cut/break better in straight lines than on curves. If you want to get fancy you can use a couple layers of overlapping designs. 
Below are a pair of top rhino doors I created for a Deathwatch Killteam Rhino.