Monday, September 7, 2009

A few terrain experiments

Just a few quick updates while baby is sleeping.

First, the completed Blood Bowl board.


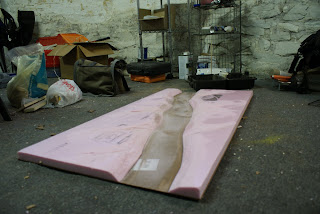
Second, a few pictures of an 2ftx4ft terrain tile for a flames of war desert gaming table. This one contains a dry river bed. Its my first time creating a permanently sculpted table. I plan on creating 4-5 of these tiles. as each is 2ft x 4ft, you can assemble any 3 of them to make a full 6ftx4ft gaming table.


Friday, August 7, 2009

Task 1 - Hay Bales

So my first detailed Flames of War terrain installment will be hay bales for my eastern front farms. These are fairly simple, using only 2 materials with the exception of the sand, paint, and flocking material used to make it match your gaming table.

First I started with some simple arts and crafts clay I bought at AC Moore for about $6. Its simple non-toxic stuff, but needs to be stored in a zip-lock bag to keep from drying out.


I took a small amount of the clay and formed it into a ball slightly smaller than a golf ball. I then affixed it to a piece of tin foil, and slowly moulded it into a rough bullet shape. The tin foil could also be paper, wax paper, cardboard, or whatever else you have at hand. It serves two purposes, (1) keeps the bail from sticking to the surface you are working on and (2) allows you to easily rotate the lump of clay.


I then took a simple scuplting tool I made from a length of dowel. I just cut the end of the dowel at an angle and sanded both sides until I had a blade-like shape.


Starting radially from the top of the clay, I used the sculpting tool to create hash marks to represent the individual pieces of hay.


After I had done a complete circle, I turned the tool sideways and made an indent into the clay just at the bottom edge of the previously made hash-marks. This is to give the impression that each higher layer of hay overlaps the layer below it.


I then repeat the above two steps several times, working my way down the clay, until I reach the base. Once I got in the groove of things, it took about 5 minutes to do each bale. Like when working with green stuff, it helps to wet your tools occasionally to keep them from sticking.


About nine hay bales later, adding some irregularly-shaped cut and bevelled pieces of MDF, and voila! Hay bales for your friendly neighborhood Russian farm. Just wait 24 hours or so for them to fully dry (they are a fairly solid lump of clay, so can take a while to dry), add sand, paint, flock, and you're done.


Tuesday, August 4, 2009

Josh has two problems...

Last Tuesday at 3:56am, my son Rohan entered this world kicking and screaming and, according to every parent willing to give their opinion, will change my life forever. This has left me with two problems.

Problem #1 - With his (hopefully) consistent 3-hour sleep/feed/poop schedule, I am left with 1-2 hour windows of time (when I'm not catching up on sleep) to kill where I can't really go off and do something.

Problem # 2 - Below is a picture of the gaming table I built during an industrious phase when my wife and I first bought our new house about a year ago. As you can see, it is a perfectly nice gaming table. Problem is, I haven't been able to actually play games on it, as I never took the time to create any gaming terrain for it.


Thus evolved the solution to both problems. Starting the weekend before my son was born, I set out to populate this gaming table with terrain. As my latest tabletop gaming obsession is Flames of War (www.flamesofwar.com), and there seems to be an abundance of Normandy gaming tables out there, I chose to take the route of making a table typical of the Eastern Front. Here are the materials I set out to use

- 1 large bag of playground sand
- 2-3 2ftx4ft sheets of 1/8in thick MDF
- 1 large container of spackle
- a half dozen wire coat hangers
- a large sheet of pink insulation foam
- a gallon of dark brown paint
- a large jug of waterproof wood glue
- 3 moulded resin russian farm houses
- 1 door mat
- 1 woodland scenics tree kit
- 1 shaker woodland scenics brown static grass flock
- 1 packet of hobby clay
- 1 package of 4 2in diameter styrofoam craft balls
- 1 spool small guage wire

Now, I made some significant progress before beginning these blog entries, so the pictures below shows that point I am currently at. I plan to go back and detail my various steps for each type of terrain piece as the project evolves.

The Table with the Goods

Russian Farmhouses

Barbed Wire

Dragon's Teeth

Minefields

Swamps

A Plowed Field


Monday, June 15, 2009

Cutom Blood Bowl Pitch

Ok, so I've been away from the blogosphere for a while. Life's been busy, have a baby on the way (a boy, future gamer, due in only a few weeks). After a hellish Monday I don't really have the energy to do any productive assembly or painting, so I figured I'd sit on my lazy but in front of the TV and show off some of what I've accomplished in the last several months.

First installment, the blood bowl pitch. I put this together as a project to learn how to use the airbrush I received as a birthday present from my wife and family. I've also been debating converting myself up a Skaven team using a cheap battleforce I picked up a few months back.

It started off as an appropriately sized piece of pink insulation foam, painted and textured like you would a model's base or a gaming table. Painted brown, and drybrushed in slightly lighter shades. Once this was done, white glue was used to glue on a few types of static grass I had lying around the house. This was fairly heavily shallacked to protect it from the rigors of gaming (and the remainder of the assembly).

Once I had the basic block of dirt and grass completed, it came time for the airbrush. The overall pitch borders, centerlines, and other major lines were taped off using masking tape (thus why the shallacking was so important), and sprayed with the airbrush to create the lines. I actually found that sticking the tape to a wall or my pant leg prior to sticking it to the pitch removed some of the adhesive and kept it from tearing away the static grass on the gaming table.

I liked the look of the airbrushed lines, as spraying it on with the airbrush made it look like the painted lines on an actual playing field. The biggest challenge was the gridmarkers. Those were created by drawing the grid pattern on a piece of cardboard and cutting out cross-shapes at each point in the grid. This template (mine was about 12x12in square) was then used with the airbrush to create the repeating pattern.

The half/reroll markers were painted as normal with a normal brush and GW foundation paints. The scoreboard (still in work in progress) and dugouts were assembled from popsicle sticks and dowels, using a hot-glue gun.

And finally, the pictures:


I will update again when the scoreboard is finished. I am debating painting some sort of emblem in the center of the playing field.

Wednesday, February 25, 2009

Monday, December 1, 2008

Chaos Ogres 2

Update on my chaos ogre conversions. You'll have to bear with me, as I'm not terribly good at the whole photography thing. First, the chaos ogre with great weapon.


Chaos Warrior Chaos Ogre.


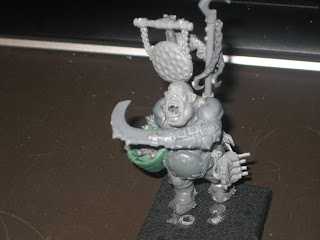
And a quick ogre butcher conversion I'm attempting, mostly just bitz swapping and a little green stuff for the cauldron.


Monday, November 17, 2008

Chaos Ogres

So, after a short side track of creating some buildings for an upcoming Mordheim campaign, I've once again been bitten by the Chaos bug. My latest poject has been a unit of Chaos Ogre Beserkers, Marked by Khorne. These have probably been my most ambitious conversion/green stuff project to date. Many are still in process, but the warrior is essentially complete.


x